Friday, October 28, 2011

Dollar Store Entertaining Craft


This was a fast project and only cost $3.00, plus the cost of your glue!


Supplies are two plates one candlestick, and glue.


Glue the candlestick in the middle of the bigger plate.


Glue top of candlestick to second plate and you have a great serving piece, or display piece  for everyday use, or your next party.  I placed some silk leaves and gourds for a fall center piece.

Have a great weekend.  And remember I am always available here.

Wednesday, October 26, 2011

Add some color

                                                        photo via
  
This maybe too much color for you, but it is very exciting.  Just think coming home to this,  surely this would make you smile.

                                       photo via

How about this yellow, it is like having sunshine everyday, no matter the weather.

                                                       photo via

Okay, so if you are not that brave, try just one wall.  This fun dining room adds lots of color just through the one wall.

                                     photo via

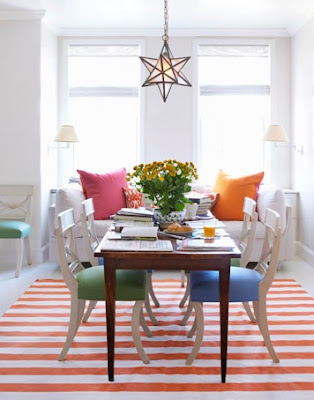
Lastly, this shows just a little color in the chairs, rugs, and pillows.  

Try adding some color today even if it is just a block of color in a frame.

See you Friday.

Friday, October 21, 2011

Super easy accessory


This will take you maybe 15 minutes!  

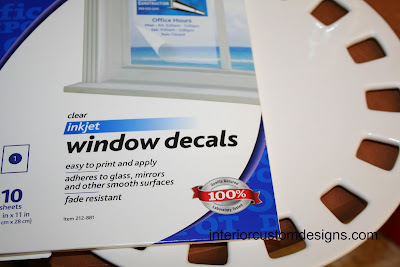
These are the supplies needed.
A plate, mine is an old one from a Southern Living party, but any will do you can even find one at the dollar store if you don't already  have one to use.  You will also need these window decal pack from an office supply store.
Decide on your design, mine was a very simple one.  But you could also choose a holiday inspired design.


  After you have made your design, read the directions on the decal sheets and print your design.  Then all you will need to do is peel off the design and apply to the plate.


Since my plate had these openings, I decided to tie ribbon around for some added interest. There you have it!


You can also hang it on a wall with a plate hook if you don't want to display the plate.

Hope you have a great weekend, and remember I am available for many services.  Visit my website, here, for a list of services.


Wednesday, October 19, 2011

Hang up that stuff!

Today I have searched to find some clever ideas for hooks.  Really these ideas should be able to be made with things you may have around the house.

This was so clever to me!  It is from  Ohdeedah and they can be found on Facebook here.
You could substitute other toys like power rangers, army men, or even Barbie heads!


This hook rack was found at Design Sponge.  The wood could be covered with left over wrapping paper or left over wallpaper.  As you can see from this photo the hooks don't even match.


In this photo from A bowl full of lemons, there are also mismatched knobs.  You could  consider using clothespins, or old and/or broken jewelry.

Hope you will find inspiration here today!  
See you Friday with an idea for a craft to do over the weekend!

Friday, October 14, 2011

Inexpensive Art


Postcards are an inexpensive way to make some art work!  Just mat on a piece of construction paper.  They make a bigger impact when you choose a group.


This is an old postcard I found at a flea market and used household aluminum foil for extra interest.


Here is one of a set of chinese postcards that came in a pack of 15.  The mat is mulberry paper.


These  have not been framed, but they are some cards I picked up on a trip that would be great framed in a square frame.

Please bare with me as I update my blog, and please feel free to comment if you have a suggestion.  Have a great weekend.

Wednesday, October 12, 2011

This rugs too big, this rugs to small, this rugs just right...

When choosing an area rug there are a few things to keep in mind. In most rooms you can take the entire size of the room in mind and leave only a border around the outside of the room, or you can size it according to your furniture. For example, if you have a conversation area, you can choose to have all the furniture fit within the rug or you can use a smaller rug under a piece of furniture like a coffee table.

In bedrooms you have more choices. As before, you can use one large rug and place the bed in the center. Or, you can use runners or small rugs on either side of the bed. You can also place a rug towards the end of the bed and have it stick out beyond the bed.

In eating areas it is best to give yourself at least two feet beyond all sides of the table. This allows most chairs to rest on the rug when you are seated.

Lastly, let us consider an entry way. Rugs imply a direction, so if you want to draw someone towards the back of your home a long runner, or a rectangular rug going in that direction will lead people naturally. If you have many path options, you may want to consider a round rug. This creates a sort-of landing which will give people the chance to stop and decide on their path.

I hope you enjoyed this post, and remember if you need help in your own home, I am available. My contact information can be found here.

Friday, October 7, 2011

Super, fast and easy home office accessory


This project will turn your post-it notes into something special. I saw something similar to this on pinterest, so I decided to try and copy it.


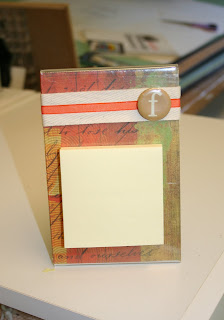
Above are the needed supplies: An acrylic 4x6 frame, decorative paper, some ribbon, some type of embellishment, post-it notes, and glue.


Cut your decorative paper to fit frame (4x6) and insert.


Wrap some ribbon around the top and secure with glue on the back. Then add your embellishment, mine I found mine at the dollar store a very long time ago, but you can use buttons, a silk flower, or a 3-D sticker. To finish glue the post-it note on the frame and you have a one of a kind home office accessory.

Have a great weekend!


Wednesday, October 5, 2011

Making your room a little more interesting

I really don't like the idea of "rules" when decorating, but there are some things you can do to enhance a rooms appearance. A suggestion for this is making sure you use straight lines and curved lines. In the photo above (from Horchow) The sofas are very linear in design, but the coffee table has rounded edges and and ottoman is curved on top and on the bottom. They have also placed a round mirror above the credenza to enhance the curves. This balance helps to make a successful room.


This is another photo from Horchow where you can see this principal applied again. In this photo you see the round side table and the two indian inspired poofs. These help to counterbalance the very straight lines of the sofa and pillows.


I included this bedroom from Janie Hirsch, so you could get an idea of how a bedroom can embrace the same qualities. In most bedrooms you find very severe lines with the bed, the dressers, and night stands. But, in this room you see the bed has curves, the chairs are rounded and the table by the chair is round. It helps to make the room not only interesting, but inviting, and tranquil, you eye travels around and isn't drawn to one particular item.

I hope you have seen some helpful ideas today, and remember if you would like help in bringing these looks to your home I am available. My information can be found here at my website.

And as always, please pass this along to friends if you think they maybe interested. I have added a new way to subscribe to these post. It is located on the left hand side of the blog. Once you have signed up be sure to look in your junk email for confirmation, if it does not appear in your regular email. Be back Friday with a fun weekend craft!